Monday, December 10, 2012

Christmas and Birthday Banners


 Last Friday I was reading the weekly e-newsletter I receive from Stampington & Company and in it they featured a project by artist Shannon Sawyer for a journal which they call a Christmas "To Do" list. It was Shannon's project that inspired my banners. The cover of the journal actually featured a banner similar to the one I made in that it used the words Joyeux Noel.


I also liked the idea of making another banner with the word "Peace". It would fit with the theme if I used French for that too, so I googlized the word and also made a Paix banner.


I enjoy working with paper but I'm not an aficionado. I don't craft with paper very often but I've always had an affection for pretty paper and I collect it when I see something that I really like. I tell myself that it is for another day. I never know when I might come up with the perfect project or have that special gift to wrap with extra special care. My holiday banners were perfect for breaking out my paper stash.

Quite a few years ago, pre 9-11, I flew a lot of what United called Shuttle. I loved working those trips. We had busy days that went by fast with 16 to 18 hour layovers in great places! Shuttle is gone now and so are those great trips that I remember with affection... Anyway, back to my banners. The paper I used for the banners I'm blogging about today, were purchased way back in the 90's while I was on one of those wonderful Shuttle layovers in Salt Lake City. I remember this because there was an unbelievable scrap-booking store in the mall across the street from our hotel that had all kinds of beautiful paper and supplies for crafting with it. I shopped there more than once... I was like a kid in a candy shop. I occasionally think about that store and wonder if it's still there.  

The tools I used for my project were tools that I had on hand. Paper scissors (my sewing scissors are cherished and remain "pure" by never touching paper! ...gosh, that sounds a bit snobbish on my part but at least you know how I feel about my sewing scissors, and it is true that there are mineral additives such as clay in paper that dull scissors quickly.), pinking sheers, two rotary cutters with two different blades, rulers and a cutting mat, a glue stick, a tiny round hole punch, a heart shaped hole punch, some bakers twine and my computer and printer. I also used some semitransparent template plastic that I had left over from a quilting project I did years ago. Since I'm not serious about crafting with paper I do not own a paper die cutting machine like a Cricut, or a Sizzix but I imagine that if I had one I could have done all kinds of fancy shapes and actually cut the letters out of paper rather than just printing them. ...*sigh* I might have to consider a die cutting machine one of these days.


The first step was to figure out what shape I wanted to make each individual banner and how big I wanted to make everything. Once this was done, I cut out a template from the semitransparent plastic. I used this template for the letters and since I could see through it; it would be easy to center the letter in the shape. I then went to my computer to play. I opened up Word and experimented with fonts and found the one that gave me the "feel" I wanted. I then played with the formatting, trying to space the letters so I would have room around each letter to cut out the shape that I had made from the template plastic. I did print out a couple of drafts on plain paper to make sure I had the spacing right before I put my fancy paper in the printer.

Once I had my letters printed out on the fancy paper, it was just a matter of cutting everything out and putting it together. Using the template, I traced the cut lines for the letters and the rest of the assemblage was cut with the rulers and a rotary cutter. Just a note about the bottom backing layer that has the pinked edge... I cut this layer out with a straight/plain edge and then pinked the edge after all the layers were glued together. Once all the individual banners were assembled I punched tiny holes at the top on each side of each individual banner so I could string the bakers twine through them and make my banner swag.


I was feeling inspired and was having so much fun making my Christmas banners that I decided to make a couple of Happy Birthday banner swags while I was at it! By the way, Mother Nature was in a stormy mood today and it was pretty much overcast all day, that's why my pictures are on the dark side.


After making three banners with the pennant shape (Joyeux Noel, Paix and this birthday banner) I thought it would be fun to try a square shaped banner...


For this banner I used a rotary cutter with a squiggly blade to cut out the bottom backing layer and I added paper punched hearts.

All in all I had a ton-o-fun and I have 2 days of dishes sitting in the sink to prove it! Maybe I should switch gears and go get a little work done! Or... New Years is right around the corner! I think I NEED a banner for that! : D  

Wednesday, December 5, 2012

Pumpkin Pie

 I only make pumpkin pie around this time of year and it is one of my favorites! The filling is really nothing special, I use the recipe that can be found on the can of Libby's 100% Pure Pumpkin with just a few alterations.


Here is the recipe as I make it:
1/3 cup Agave Syrup
1/2 tsp salt
1 tsp ground cinnamon
1/2 tsp ground ginger
Approx. 1/8 tsp ground cloves
2 large eggs
1 can Libby's 100% Pure Pumpkin
1 can (12 fl. oz) Carnation Fat Free Evaporated Milk
1 unbaked 9-inch (4 cup volume) pie shell 

Combine all ingredients except the pie shell in a blender and blend well.
Pour into pie shell
Bake in preheated 425* oven for 15 mins. Reduce temp to 350* and bake 40-50 mins or until knife inserted near center comes out clean.  


Typically I think most people make pumpkin pie too sweet so I cut the amount of sugar in half. I also reduce the amount of cloves by about half too. Another choice I make, that makes the pie lighter, is I use fat free evaporated milk. Those are the only alterations I make. For the pie shell, I use my oil crust recipe that can be found here: Pie Tutorial

The thing that I think makes my pumpkin pie special is how I dress the pie up with a leaf edge. It is easy to do, it just takes a little extra time. When I divide up my pie dough I make one of the balls a little bigger than I would if I were making a 2 crust pie. This will make a slightly thicker bottom crust plus you don't need as much dough for the leaf edge as you would if you were making a top crust for a fruit pie. I roll out the big ball and place it in the pie plate as usual.


I roll up the extra, hanging over dough and form a ledge that I will place the leaves on.


Just a note about the pie plate. Kaitlin commented in my pie tutorial that a pie plate with a lip will give the crust something to sit on. I guess I really never gave it much thought and my "go to" pie plates have this feature.


Anyway... The next step is to roll out the second dough ball to make the leaves. I use a leaf shaped cookie cutter and cut as many leaves as will fit on the dough. I don't worry about how many I'll need because I always end up with more than enough. Once the leaves are cut I use a table knife and lightly score the leaf veins in the dough being careful to only score the dough and not cut all the way through.


Now I use the knife to pick up the leaves and place them on the pie shell, overlapping them slightly.


I add the filling and the pie is almost ready to put in the oven. I learned the hard way that if you don't protect the pie edge, it will burn so it's important to cover your edge before it goes in the oven. There are commercially made rings that are for this purpose but it's not necessary to own one. It is easy to construct your own barrier from strips of aluminum foil. Just tear off a few strips about 3 to 4 inches wide and loosely cover the lip of your pie plate and your leaf edge. When you do this be careful that the aluminum foil doesn't dip into your filling... still leave it loose however. I happen to have a mangled piece of aluminum that I saved years ago from something (I don't remember what) that I purchased from the freezer section at the grocery store. It works much like the commercially made rings would. I just place it on top of my pie plate before putting it in the oven.


I will bake the pie for the maximum amount of time, a total of 65 minutes... plus if it looks like it could bake longer without burning or getting too brown, I'll leave it in for another 10 or 15 minutes just for good measure. That way I feel confident that it is done and I won't need to "mar" the pie surface by testing it with a knife. In the photo below I had an oopsy-doodle moment and accidentally dipped my aluminum protector in the pie. Oh well... it was still very tasty! 


Now here is a little bonus that the kids enjoy! Actually, I'm pretty much of a fan too... I ball up the unused pie dough and roll it out as if I were making a crust. I put it on a square of aluminum foil and sprinkle liberally with cinnamon sugar. I bake this along with the pie for the first 15 minutes (while the oven is set for 425*). I remove it from the oven when I turn down the temperature to 350*. YUM!  ...a little treat!  


Sunday, November 25, 2012

My Rachel Ray Moment

Here is a super quick dinner idea!

I was at my local grocery store last week and they had Aidells Hawaiian Style Chicken Meatballs on sale. Okay I said, I'll give these a try. The back of the package had three different serving suggestions and I thought the soup option sounded like the easiest.


Of course I didn't think it all the way through when I was shopping and failed to buy bok choy. I did however, remember the noodles and the first time I made this, I used Japanese Soba Noodles that cook up in a jiffy, just 4 minutes. Dinner was ready in less than 30 minutes! Here are the ingredients that I used in the first attempt:
Chicken broth
Aidells Meatballs
Ginger
Braggs Liquid Aminos (This tastes very much like soy sauce)
Soba Noodles 
Baby Spinach


I  used 3 boxes of chicken broth plus a little water & the entire package of meatballs. Ginger and Braggs were added to taste and I used 2 packages of the soba noodles. After the noodles were done cooking I removed the pot from the stove and stirred in about 8 to 10 ounces baby spinach. Voila... dinner!    

Holy Cow was this stuff popular! All my guys, Frizzlecuff, Surly, & Virtual were oohing and aahing and smack'n their lips! It was requested that I make this tasty dish again soon but they wanted me to try a more "chewy", substantial noodle. Well, tonight was the night for round two. The only thing I did differently was... I used udon noodles instead of the soba and at the last minute I decided to throw in some chopped green onion. It took about 40 minutes the second time around because the udon noodles needed about 13 to 15 minutes to cook.


This is now one of Surly's favorites!


Wednesday, November 21, 2012

Newtons First Law of Motion

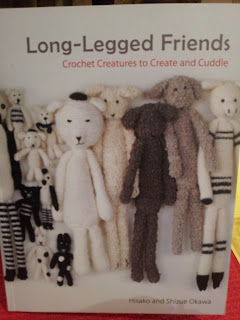
Lately I have felt inspired by many crafty projects but I am plagued by inertia. I have been crafty only in my dreams. I actually tried yesterday! I recently bought a crochet book titled "Long-Legged Friends" by Hisako and Shizue Okawa.


Aren't those the cutest little creatures? I am particularly fond of the curly haired poodle. I even found the perfect yarn while on layover in Kona a couple of weeks ago.


Now, I am not that experienced with crochet and I can muddle through most of the time. I think it would be safe to say that I am a newbie. After 9 or 10 failed starts I threw up my hands in frustration and quit. (Not exactly a rage quit but close.) As perfect as the yarn is for a curly haired dog, I could not for the life of me see the stitches! ARGH! Tomorrow I am spending Thanksgiving with my guys and our friends the Carter's. Their teenage daughter is an amazingly talented fiber artist and I'm hoping she can give me some tips on how to see the bleep'n stitches and at least get me started. We'll see if it's a lost cause.

I absolutely NEED to make a new duvet cover for my duvet. Back in September when I was on vacation I was highly motivated and designed a cover in my EQ7 quilt design program. 


I cut it out and even managed to sew 224 half square triangles together before it was time to return to my jet lagged work life. So... that's where that project ended, at least for now.


Now all I need to do is sew together 504 pieces plus the border sashing! I really should get on that.

Meanwhile, I have come across a super cute doll pattern for hand sewn dolls designed by Shelly at Gingermelon Dolls. They are the perfect take along project to haul all over the world with me! I've ordered felt and safety eyes for this fun project. If I can get this one "off the ground" all the young girls that I know might find themselves a recipient of one of my creations! The boys might end up with a curly haired dog if that one "flies"! 


If you too feel inspired by this cute pattern it can be found here: http://www.etsy.com/shop/Gingermelon

Then this morning I woke up thinking about Christmas themed projects... Oh well. I guess the list goes on!

Virtual, my physics major son tells me that Newton's First Law of Motion is at work here... an object (that's me) at rest stays at rest unless acted upon by an unbalanced force. I am experiencing NO net force so my velocity is holding constant at zero. I'm thinking I am in serious need of an unbalanced force of motivation! 


Saturday, October 27, 2012

Ironing Board Cover

Not too long ago I was suddenly aware of how worn, scorched and ugly my ironing board cover was. (It was so ugly in fact that I failed to take a before picture.) Maybe if I washed it I could restore at least a glimmer of it's former "cuteness". I know... a cute ironing board cover? Well, I've always felt that if you have a chore to do that is not exactly a lightning rod of motivation, you might as well do what you can to improve your state of mind while doing it. It always helps me, to adjust my attitude, if cuteness reins. Washing my poor grungy, shabby, timeworn cover didn't do much to lift the ugliness from it so it was time to replace it. I went on a search for a cute cover, one that inspired attitude adjustment. Maybe it's because I live in a small community that my choices were limited, but all I could find were covers aimed at utility... nothing cute or beautiful.
At about the same time, I came across the "Hello Sunshine" collection at Connecting Threads and decided that the "Laundry Day" print would be perfect for a new cover. The "Sunkissed Flowers" in Cashmere Blue came in at a close second. (http://www.connectingthreads.com)
The problem was, how? I googlized (is that a word?) how to make an ironing board cover and the Google Search Fairies came up with Eva Garlick's blog Sew Much Good... She has a fantastic tutorial that did not require a pattern, check it out here: http://sewmuchgood.blogspot.com/2012/05/iron-board-cover-fast-and-easy.html This was a super easy project and it only took me maybe, two hours to make (if that).  I could have used my serger to stitch the casing onto the cover but I decided to use the overlock stitch on my regular sewing machine instead. I also decided to use a commercially made bias tape rather than making my own. I found that when I pulled up the elastic to snug the cover over the ironing board it was easier to distribute the tension in the elastic more evenly if I took the cover off a couple of times and distributed the gathers before replacing it on the board...  Anyway, I now find myself looking for things to iron! I can't believe it! I wonder... how long is this going to last?


Friday, October 19, 2012


Pie Tutorial


This year has been an unbelievable year for apples… in fact I think I’ll be referring to 2012 as the year of the apple! My trees are overburdened to the point that a couple of them lost limbs! Needless to say the abundance of produce has translated into an abundance of pie at my house. I was on vacation from work in September and I made a pie EVERY DAY! Pie was the last thing we ate before calling it a day and we had what was left over with tea or coffee for our breakfast every morning. I have to confess that it has also translated into an increase in waistlines for Frizzlecuff (my husband) and me. My two sons, Surly & Virtual, could eat pie all day for months and never see any effect… I’m jealous. Anyway, here is how I go about making a healthy oil based whole wheat pie crust and apple/blackberry pie filling… A note about blackberries; they grow wild here in Oregon and are considered a weed by many. Frizzlecuff has been known to annihilate his fair share of the brambles that grow in hedgerows and over buildings on our property but... he hasn't eliminated all of them! They are rather hearty and tenacious and it’s a good thing that they produce such a flavorful, sweet, juicy fruit or none would be found around our acreage. By the way, it was a bumper crop for blackberries this year too.
        
I've gathered the ingredients for the filling which I will make before I make the crust. You will need:

Juice of 1 lemon with as much seedless pulp you can manage to get
 1 1/4  cup cold water
5 cups of cored and cubed apples with the peel on (4-5 apples depending on the size)
 Heaping 1/3 cup Minute Tapioca
1 tablespoon cinnamon
1/3 cup agave syrup
1 tablespoon vanilla
2 1/2 cups fresh blackberries rinsed and drained


Put the lemon juice with pulp and water in a large sauce pan or Dutch oven. As you core and cube the apples, stir them into the lemon juice mixture so that they don’t turn brown. Once all the apples are in the pot, add and stir in the cinnamon, tapioca and agave syrup. Cook on the stove top until the mixture is bubbly and the tapioca has thickened the juices.


Stir in the vanilla and blackberries and set aside. (Off the heat) I take the time now to pre-heat my oven to 425*F.


Now for the crust… you will need:
1 3/4 cups of whole wheat pastry flour
1 teaspoon salt
1/3 cup cold water
1/2 cup extra light olive oil


In a bowl, mix the flour and salt together with a fork. Add simultaneously, the oil and water. Mix together with the fork until all the flour is incorporated.


Form the dough into two balls, one slightly larger than the other. The bigger ball will be the bottom crust and the smaller ball will be the top crust. Now it’s time to roll out the crust and to do this you will need 3 pieces of waxed paper.
Lightly dampen your counter top with a wet rag or sponge and adhere one piece of waxed paper to the counter top by placing it on the moist surface. Once the paper is down, place the larger of the two balls of dough in the center of the paper and slightly flatten into a circle of dough. Place a second piece of waxed paper on top of the dough and roll out into a large circle.


Peel off the top piece of waxed paper and set aside to use again when you roll out the top crust. You can easily pick up the bottom crust with the paper underneath it. Flip the dough over so the paper is on top as you carefully place it in your pie plate trying to get it as centered as you can. You should have a little bit of overhang of dough on your pie plate after you carefully press it all the way down into the plate. Slowly peel off the waxed paper being aware of the fact that the folds and creases along the sides will want to tear. If it does don’t worry, you can press the dough together to heal a small tear without too much trouble.


Repeat the same method for the top crust. Use a fresh piece of waxed paper on the counter surface and use your recycled piece again on top. Once the top piece of waxed paper is removed you can cut your pie vents anyway you choose. I have a “signature” top that I use for all my crusted pies. You can use cookie cutters, a knife, or a fork, whatever inspires your creativity. My Mother-in-Law used to cut a tree design into the top of her pies with a knife and used a fork to seal the edges of the pie. Anyway, once this is done it is time to add the filling to the pie plate, put the top crust on and seal the edges.


In this final picture before the pie goes in the oven, I have sprinkled the top with cinnamon sugar

.

Bake the pie for 10 minutes at 425*F then reduce the temperature to 350*F and bake for another 30 minutes. I think it is a good idea to place aluminum foil or a cookie sheet on the shelf underneath the shelf your pie is sitting on in the oven. (I've never tried placing it directly underneath the pie on the same shelf because I’m afraid it would change how the pie bakes.) A strategically placed barrier could save you the oven clean-up of potential overflowing filling. (This happens to me all the time!) You can eat your pie hot but be aware that the hotter the pie the more "runny" the filling will be. Tapioca needs to cool before it truly sets up. I find my pies to be the perfect consistency when at room temperature.  


Well, that’s it, that’s how I make pie. Perhaps in future posts I’ll cover different fillings. For now anyway it’s apple/blackberry pie.
BON APPETITE!